Sunday, June 29, 2014

AND.....

I love the word "AND". It is so uplifting and full of hope. AND means there is more! More is usually better than less. Here's a zen doodle I did to celebrate AND! I hope you like it AND come back to see more.


I thought it would be cute as a Maternity Pullover top. What do you think? 
Mommy AND baby


Or maybe on a coffee mug? Coffee AND cream?


Friday, May 16, 2014

Revamp Your Cooler for Outdoor Parties!

My hubbie and I are about to buy a new house and it's got a basement that is ripe for converting to our new entertainment room. It has a garage door opening to it and we're already hard at work designing that new space. I also wanted to make an ice chest/cooler like one I had seen that converted an old refrigerator into a cooler.  During my search for it again, I stumbled on one that I like even better.  Probably because it seems like it will be WAY easier to do. I like that!  Instead of using an old refrigerator, it uses an old cooler. You just build a frame around it and put legs on it and that's it. Okay, it's just a bit more involved than that, but the results are great!

Rustic Cooler Tutorial at Killer B Design
 
I found this at Killer B Design and there's a great tutorial to show you just how to do it. I think I'm going to tackle this project once we get moved into the new space. I can hardly wait!! If I actually end up doing this, I'll post my photos.


Wednesday, May 7, 2014

How To Make Your Own Almond Milk


Well, lately I've been trying to eat more healthy. I like a good smoothie from time to time so I can gulp down a whole bunch of veggies and fruits real quick without having to do any cooking. Sometimes I use fresh organic apple juice as my base (when I want it to be sweet). Other times I prefer a "milk" base. I use almond milk for that. The store bought ones are fine (but a bit pricey). I decided to make my own. Making your own almond milk isn't anything new. I actually don't have any idea how almond milk is commercially prepared, but here's my take on my own almond milk.


It was really easy, but just a bit time consuming. (A fact that I didn't entertain when I got up at my regular time and thought I could do it before work.) Lesson learned.

First off, you need to soak the almonds in water overnight in the refrigerator. That part means you have to pre-plan to make it.  Just put that in the refrigerator over night and the following morning, pour off the water that was in the cup. Rinse off the almonds and then throw them and new (filtered) water into a blender. Blend away! 


Then strain the liquid and voila' - Almond Milk! If you want to add anything to it such as vanilla or some kind of sweetner, add it in after you've strained it. I added a little bit of vanilla extract to mine because it makes my smoothie taste better. Without anything added, it pretty much tastes just like almonds.

The details:

Soak one cup raw almonds in one cup of water overnight in the refrigerator.

Next morning pour out the water and put the almonds into a blender. Add 3 to 4 cups of water. The amount you use is really a personal preference. If you add 4 cups it will be more liquidey than if you only use 3 cups of water. Bottled and/or filtered water is probably best, but if you don't have that, just use tap water.

Blend the heck out of it!  Several minutes should do it. At this point what I did was to pour the liquid through a fine mesh strainer into a bowl. I used two strainers. While one was dripping out, I pressed the other one to get all the liquid out. Then I pressed the other one out and so forth.


 For my purposes, this straining was enough for me. I was using it in a smoothie, so it didn't matter that it still had a little bit of almond pulp in it. If you want it smoother, you'll need to strain with a nut milk bag.

The pulp that's left must be useful on it's own. I went ahead and saved mine, just in case I find something to use it for. Maybe almond butter?


I love being able to do this all by myself. This way I know EXACTLY what's in it. There is also that self-satisfaction from having made this instead of buying it. Get's me feeling like a pioneer woman or something. Next think you know, I'll be sloppin' the hogs!


I really think I could just drink this straight if I wanted to. I think it needs to be really chilled to make it better.

I'd love to know if someone knows what I can do with the almond pulp that is left over from making the almond milk.

Enjoy!

Sunday, March 2, 2014

Bleeding Heart Zen Doodle

Wow. What do you suppose is going on in my personal life to draw out this zen doodle in me?  Lol. (Yep, I just said "Lol").  My personal life is just hunky-dorie, so I think it was that episode of Teen Wolf I watched that must have crept into my subconscious!  Anyhoo, without further ado, here it is.


Sunday, February 9, 2014

Homemade Cream of Mushroom Soup

All this extended and bitter cold weather always has me in the mood for comfort food. I made this Cream of Mushroom soup recently. You have no idea how comforting this was! I got the recipe from food.com. It was so delicious! I made a few tweaks to their recipe and mine is shown below the photo.


Here's how I made my version:

Ingredients
  • 8 ounces fresh mushrooms , chopped
  • 2 tablespoons onions, chopped
  • 1 -2 garlic clove, minced
  • 4 tablespoons butter (seaparated)
  • 2 -4 tablespoons flour ( separated)
  • 2 cups chicken broth (separated)
  • 2 tablespoons white wine
  • 1 cup heavy whipping cream
  • 1/2 teaspoon salt
  • 1/4 teaspoon pepper
  • 1/4 teaspoon nutmeg
1. Melt the butter in a large frying pan. Add the onions, garlic, mushrooms, white wine and about 1/4 c. of the chicken broth. Cover with a lid and cook on medium heat for about 5 minutes then cut the heat down to low and cook for about 10 more minutes. Don't skimp on the cooking time. The mushrooms will really add more flavor to the liquid if allowed to 'stew' for awhile.
2.Start your roux while the mushrooms are simmering. Melt 2 tablespoons butter and stir in 2-3 tablespoons flour. Stir continuously until it is slightly golden. Do this for at least 7-10 minutes. (If you stop too soon, the soup will taste like flour.) Gradually add in the rest of the chicken broth. Adding the broth slowly keeps the mixture smooth, lump-free and thick. The mushrooms should be ready to add to this mixture by the time the roux is done cooking, so add them on in.
3. Put 1 tablespoon of flour in a small but somewhat deep cup or jar (large enough to hold 1 cup+). Slowly add a small amount of the cream into the flour and stir until it is kind of like a paste, but not too thick. If you don't add enough cream, it will be the consistency of mud! Add enough cream to get it creamy, then add the rest of the cream and the seasonings into the jar and stir well to mix it. Then, add that into the soup mixture. Mixing the flour with the cream before adding it into the soup will keep it from lumping up.
4. Heat the soup for 5 more minutes on medium heat and then dig in!

This recipe makes about 4 med cups or 2 large bowls.

This is really a fantastic recipe and although my directions may seem a bit 'detailed', believe me it's worth it. After making it a couple of times, you'll understand why it works best this way.

Enjoy!

Thursday, January 30, 2014

Zen Tangles (more zen doodles)

With all this horrid cold weather, I've been thinking a LOT about the beach. So while my mind was wandering, my hands were doodling. I got some new pens and you can't tell by these pictures, but the orange is REALLY flourescent. I love them. These make me warm inside though it's bitter cold outside!


Sunday, January 26, 2014

Cedar Plank Grilled Salmon with fresh dill sauce

I took advantage of the heat-wave today (about 50 degrees - snow coming later on....again!). Since it was a small window of time until the return of the snow and frigid temperatures, my hubby wanted me to make my Cedar Plank Salmon on the grill. I thought it was a capital idea!  I hadn't prepared this dish in a long time, so that made it extra special.

 
I love this dish. It helped remind me of summer even though summer is several months away. I first prepare the cedar plank. (I buy mine in the grocery store in the aisle with the grilling supplies.) You must soak the plank/s for at least an hour before using them on the grill, or guess what? Yep, it will catch on fire. I use equal parts red wine and water to soak my plank in. The red wine just adds another dimension to the flavor. (I've tried using white wine before, but I couldn't tell any difference in the flavor.) The red wine with the water works perfectly!  I put the wine/water mixture in a roasting pan. The grooves in the bottom of the roasting pan help give channels for the liquid to absorb from the bottom into the wood plank.


The wood is light-weight enough, that it wanted to float, so I put a glass on it to keep it from floating. I also flipped it over a few times during the hour that it soaked. You want it thoroughly soaked with the liquid.


Then I prepared the salmon. I placed the salmon on a tray skin side down. I lightly rubbed olive oil over it. This helps keep it moist while grilling it. Next I drizzled fresh squeezed lemon over it, then sprinkled it with salt and a bit of pepper. I added fresh cut dill to cover the whole slab. Last, I added lemon slices to top it off. The lemon will release more juice at it heats up. I covered the salmon with plastic wrap and put it in the refrigerator while the cedar plank was soaking. (1 hour).

Lastly, I prepared the dill sauce so it could also sit for an hour. It actually tastes better if it's prepared the day before, but since this was a spur of the moment decision, it only got 1 hour.  I mixed equal parts of sour cream and mayonnaise, so it depends on how much you're making. Today, I used about 1/4 cup of each. This made more than enough for just the two of us today. The rest of the ingredients weren't really measured, so it's hard for me to say exactly how much went in. I will guesstimate for you. I cut up maybe a tablespoon of fresh dill. Squeezed some fresh lemon juice in (maybe 1/2 tsp.). Sprinkled a tad bit of garlic powder (less than 1/8 tsp.) To give it more intense flavor I squirted some lemon concentrate into it (probably 1/2 tsp.) Then I also added about 1/2 tsp. of dill pickle juice. The trick is to not add too much juice at the same time so it doesn't break down the creaminess of the sauce. The combination of fresh ingredients with the bottled juices makes for a fresh, but flavorful dill sauce. We love it!


About 1/4 cup mayo (left) and 1/4 sour cream (right) with fresh dill sprigs

All ingredients mixed up and served with a fresh dill sprig
With all items prepared, you can take it easy for an hour. Then pre-heat the grill to 350 degrees. Put the cedar plan in the grill and let it heat for about 3 minutes, then turn it over and heat it again for another 3 minutes, then add the salmon directly onto the heated cedar plank. Close the lid and let the grill do all the work for you. You will want to mind the grill because our plank did actually catch on fire. Luckily my husband was able to blow out the flame before it was ruined!  Cook the salmon for about 15-20 minutes. It will be opaque pink when done and will flake easily. For some reason today, mine didn't get done even in 20 minutes. I suspect either the grill thermostat was inaccurate, or the chilly wind may have slowed things down. I didn't want to continue to cook it in the grill because salmon can dry out and become tough pretty easily. So, I brought it in and took it off the plank and put it onto a baking sheet. Then I popped it into the oven under "Low Broil" for 5 minutes and it was perfect! I had intended to photo the salmon on the cedar plank, but got distracted by the flame up and then having to transfer it to the over and forgot. I served the salmon with rice pilaf and steamed broccoli and it was an awesome 'summer-time' meal in the dead of winter!!
 

Monday, January 6, 2014

"Electric" Zen Doodle

Since I did an Acoustic Zen, I decided I needed to do an Electric Zen also.  Kind of the Ying to the Yang.  Here it is.


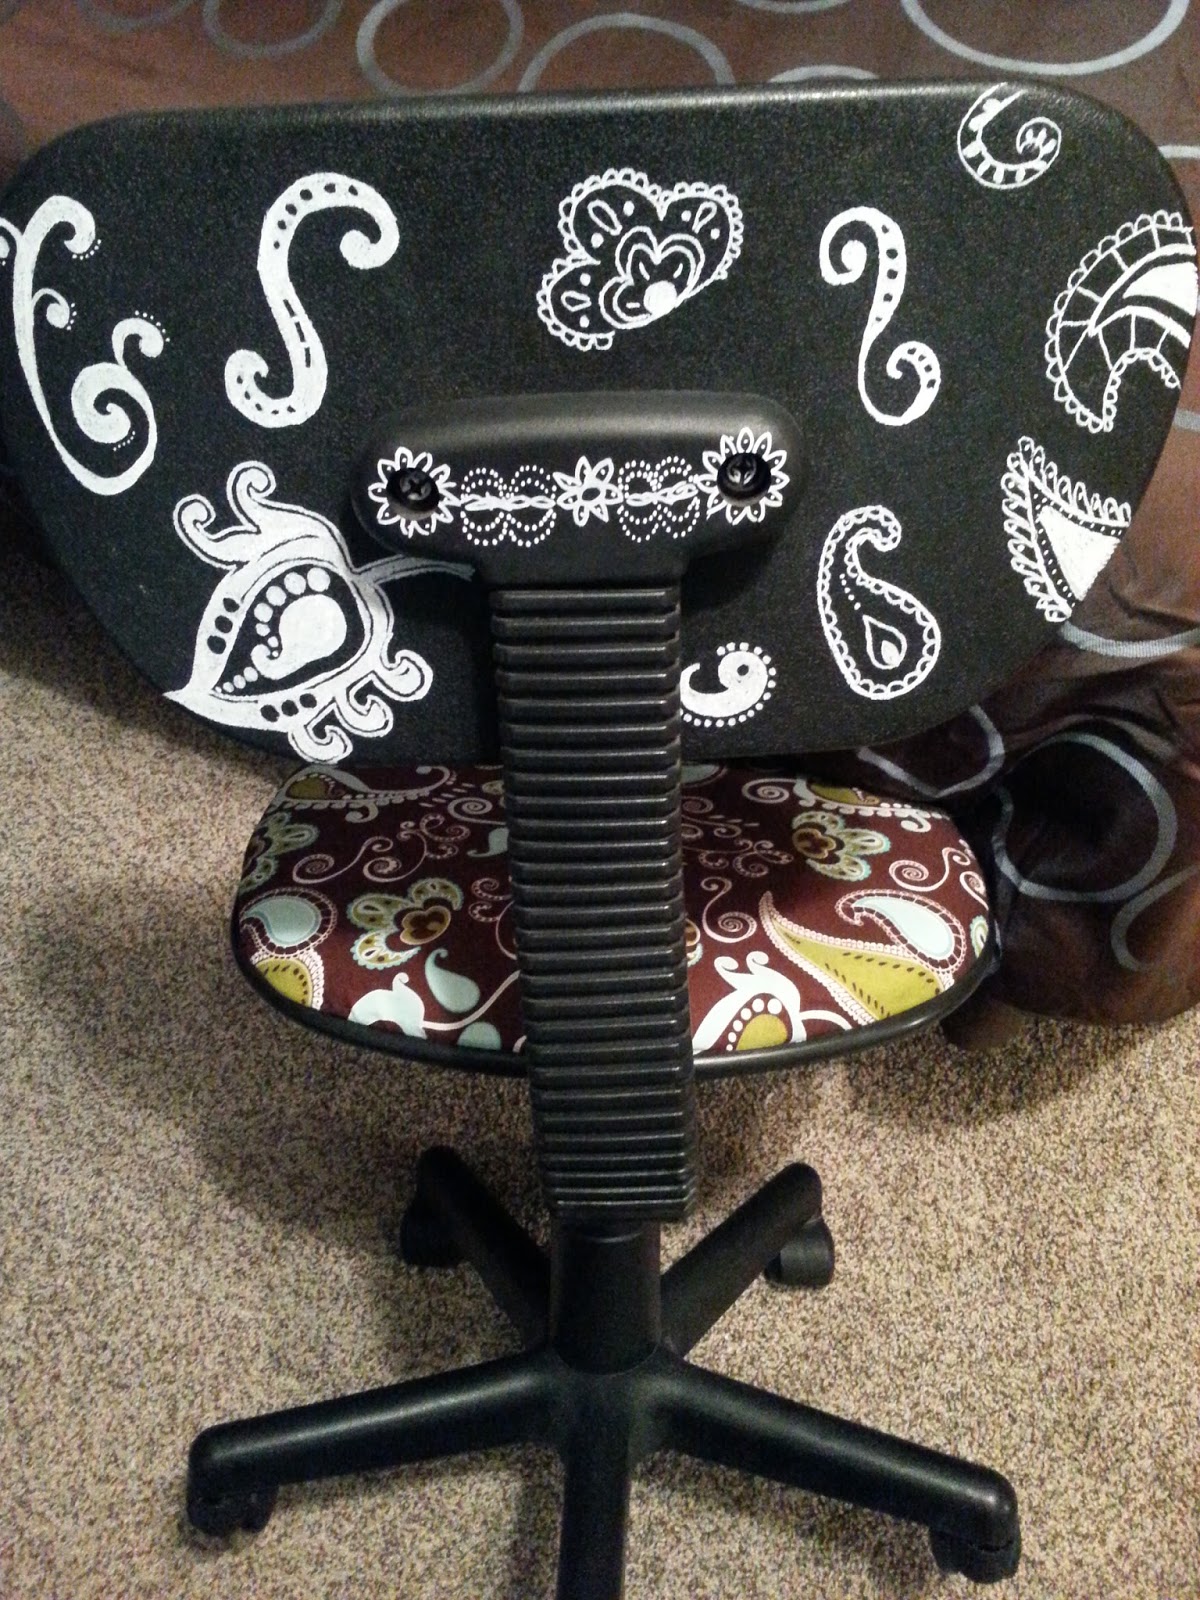
UPDATE: Office Chair Makeover (again)

I reupholstered my office chair a few months ago (see it here), but it was still needing a little something. I realized the back side of the chair was still b-o-r-i-n-g, so I gave it an update, too. I mimicked the design from the fabric with a white paint pen. Now it looks good which ever way it is facing! I still may not be through with this project...


Saturday, January 4, 2014

No Apologies for Doodling

Okay. I'm done apologizing for my Doodle Art. It is now a part of me. Deal with it.  I cannot stop doing them, nor do I want to. It is a creative outlet that is very satisfying. Here's my latest. I call it Acoustic Zen.